Thursday, 23 April 2009

Water

One of the elements we wanted to include in our animation was realistic water. Fluid simulation is something that developers are always trying to do, and always trying to improve on, so finding a solution which would be suitable for us was tricky.

We ended up uisng a simulator called Realflow. The workflow is reasonably straightforward; once the scene that you want to add water to is animated (in Maya, in our case) it is exported from Maya into the Realflow format, and imported into a new Realflow project.
From here it's possible to add fluid particles to areas of the scene. In our case we added the water to a basin, so there was a pool of water that the character would fall into. Once done it's simply a matter of letting RF simulate the movement of the particles, which is a lengthy process. Once complete, RF goes through and adds a mesh over all the particles, to give the effect of a body of water.

Finally these meshes are reimported into Maya, though they have to be left on disk so Maya can reference them, as they're several GB in size. Below is a screen shot of the final effect, once the water meshes had a water type shader added to them. Reflections and refraction are apparent, as well as some magnification of what is inside the water.

Monday, 20 April 2009

Creating and animating the big wheel

The wheel was created by using the polygon torus tool to create the circles and then they were all duplicated to create the other side. We then added the center piece and the support arms and finally the base. After that we created an individual carriage and then duplicated it to create all the others. The point that each carriage rotated around then needed to be changed so that they would each rotate around their main bar as shown below.

We then made the main bulk of the wheel a single object with its rotation point and its center and made each carriage a child of this object. This meant that when the wheel rotated it would take all the carriages with it. After this we then had to rotate the individual carriages seperately in the opposite direction to the actual wheel so it would maintain the effect of them hanging down.

Sunday, 19 April 2009

Animated Buildings

At the end of our animation, the two MMU John Dalton buildings which we modelled pop up. The JD extension building simply scales into place, but the main JD Tower does a more complex animation. The way this was done was by rigging the building with a long chain of bones, similar to a spine in a body rig. From this, IK was applied, giving a handle which could be used to bend the shape of the building. From this, the building could be animated into place in a slightly more original movement.

Volumetric Fog

One of the themes we were going for in our animation was that of the looming economic depression. To highlight this in a visual sense we thought it might be nice to render everything in our animation with a covering of fog. We decided in the end that we wouldn't use this effect, becaues it made the animation a little too gloomy, but this is what we did when experimenting.

Maya has special objects which can be created, called Volume Primitives, which can have volumetric shaders applied to them. Using a cube shaped volume primitive, we applied a fog like shader to it, which filled the inside of the cube with three-dimensional fog. The effect was good, as shown in the image below, but as mentioned above was a little too gloomy for our overall animation.

Rendering and Ambient Occlusion

We decided to use the Mental Ray renderer which is included in Maya for rendering our animation. Mental Ray has a lot of features which can be combined to create very real and life-like renders. We decided to give our animation a cartoony feel. We experimented with Final Gather and Global Illumination, but the

se effects not only took away from the cartoon style, but increased render time substantially.

We also considered using an Ambient Occlusion pass in our final animation render. Ambient Occlusion renders subtle shadowing detail to all objects in a scene, and can give images a lot more depth as a result. Three images are shown below which help to illustrate the benefits of Ambient Occlusion.The image above is a raw ambient occlusion render, showing just shadowing details of the scene.


This image shows a defaul render from Mental Ray, without the ambient occlusion pass added.

The final image shows the two combined. A lot more detail is now apparent, adding depth to the image.

In the end though, we decided for a number of reasons that we wouldn't use Ambient Occclusion. For one, it took away from the cartoon-like effect we were trying to get. This would have been enough to stop us using it, but the render time for each frame in AO would have been around 7 minutes, meaning it would have taken about a week of rendering, which was time we didn't have.

It was interesting to experiment with it though, and the results were certainly good.

Cloth

For our animation we wanted to use cloth objects, ideally in more than one situation. We decided to implement two senarios: have the character wipe his face with a handkerchief, and have the character walk through a doorway with a cloth object on it. These two situations presented different problems to be solved.

The first, that of the handkerchief, was more complex. The character was animated brushing his hand across his face, and it was during this time that the cloth object should move with the hand. The way this was done was by constraining the cloth's position and rotation to a bone on the hand of the character. This worked fine, except that it meant the cloth was following the hand from the start of the animation, so by the time the character wiped his face the cloth had been simulated for a large number of frames, and looked a mess.

The solution was to stop the cloth from following the hand until the specific point where the character wipes his face. This meant the cloth retained it's shape well, and looked more like a handkerchief when he wiped his face. An image of the character wiping his face is shown below.


The second problem was simpler; a large piece of cloth was positioned in front of a doorway that the character walked through. The cloth was constrained to the top of the doorway, so that it would not fall to the ground once the simulation began. However, when the character walked thorugh the doorway the cloth didn't react, so the character had to be turned into a collider object. This meant that the cloth reacted to him as he walked through the door. This is shown below.


Finally, so that the files we were working on didn't become impossible to work with (because the cloth tries to solve everytime you play the animation, which is very time consuming) we created a cache of the cloth's simulation, and set the cloth object to play direct from that cache instead of re-simulating.

Character Texturing

The character we started with had no texture, so we exported a texture map for him using his UV coordinates. This is shown in the image below; the white lines were the original reference.


Once we had this, we could take that reference into Photoshop and paint over the top of it the effect we wanted. This is also shown in the above image. We decided to make the character look like a disheveled business man, unhappy with life ;) which is shown below.

Character Setup


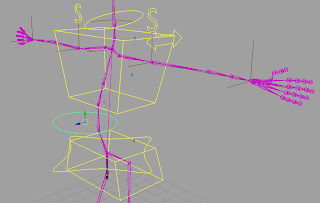
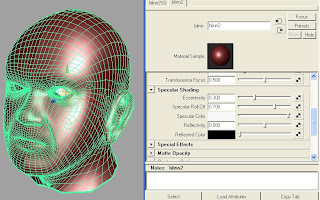
For the assignment we needed a fully rigged character which we could animate. This character needed leg and arm controls, as well as head and facial controls, so we could do some facial animation. We used a rig that we made for the body, which is shown in the image above, which has IK controllers for the arms and legs, some driven key settings for the hands so the fingers can bend, as well as controls to move the spine using Spine IK in Maya. We combined this rig with a model we found online which was suitable as it had a facial rig with it. The two things combined gave us the body and facial controls we needed to animate the character. An image of the facial rig controls is shown below.

Thursday, 26 February 2009

Object Animation

This week we looked at object animations using the timeline and keys. In the first animation the ball simply bounces. This is done by setting the first frame to have the ball on the ground, a middle frame (in this case 10) has the ball at its peak and then the final frame has the ball back on the ground. The software interpolates between these frames to create a smooth animation.


The second video is similar but this time the ball squashes like a real ball when it hits the ground. In this animation the first and last frames have the ball in the air and the middle frame has the ball on the ground where it has been scaled to look squashed.


Thursday, 5 February 2009

Building a rig, and skining


Firstly we built a very simple mesh, the rough shape of a human body, out of cubes. We made this on one side of the x-axis, then mirrored the geometry onto the other side, to make sure that both sides were identical.

We then drew out a skeleton (rig) using Maya's Joint Tool, making sure that we left bends in the legs and arms, so that when we came to add IK chains to them it would know which way our joints should bend. Once the rig was built for one side of the body, we mirrored it over the x axis so it was identical for both sides of the body.

Next we skinned the mesh to the rig, by going to Skin > Bind Skin > Smooth Bind. This allows the bones to affect the vertices of the mesh, so when we move the IK handles, we can pose the body. We then keyframed a very (very) simple run animation, which you can see by clicking below.

Thursday, 29 January 2009

Texture and UV mapping

This week we experimented with UV mapping, simple shaders such as Blin and toon. We applied a spherical UV map to the head before applying the texture.Above is the texture map we created. In the UV texture editor window (in UV mode). Select all the UVs and then UV snapshot from the Polygon menu. This will output the image and you can then simply draw on it. The blockiness of texture here is because the image we output was quite a low resolution. To apply the texture right click the object and select Assign new material. Then we chose blinn. From the side menu bar choose color->file and select the image.

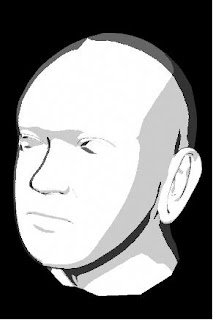
Above is the UV map for the head. We chose spherical mapping from the Create UV menu so that it would unwrap the head as if it were a sphere. Below is a toon rendering of the head done by selecting the object, then selecting the toon tab and picking a style and finally rendering.

Subdivision and Texturing

Below is an example of a subdiv proxy. Here we half a sphere and use Proxy->Subdiv Proxy to make a smoothed mirror image. By manipulating the vertices on the original half we can also change the positions of the vertices on the smoothed mirror image.
Below is an example of smoothing. By selecting Mesh->Smooth you can choose how many subdivisions you want.

We experimented with smoothing meshs in Maya by subdivision. We then used another smoothing method called Subdivision Proxy, which creates a smoothed version of the low-poly mesh you're working on, which updates when you edit it's vertices.

We then created a simple coke bottle, by extruding faces from a cylinder and scaling their vertices, and applied a coke bottle texture to it. This required some simple editing of the bottle mesh's UVs, so that the texture would be applied properly.

Thursday, 15 January 2009

Lab 1


During this lab we learnt to draw a cube, sphere, and cylinder, and position, rotate and scale them, as well as render them, in Blender.